
St. Patty's Day Wreath
- Mar 8, 2017
- 4 min read

Hi Everyone!
So with the spirit for St. Patrick's Day arriving shortly, I decided to create this fun, colorful wreath to add to your home decor!
Here are the list of materials I used for this project:
- 12 inch Styrofoam wreath.(Can be any size you want it to be, just need to follow the measuring step below to make sure you get even segments of color)
- Different colors of yarn for the rainbow
- Green yarn for the grassy patch.(Can be multiple colors of green or one)
- Small ceramic pot. Can be the size of your choice, just make sure it fits with your wreath
- Black paint
- Paint brush
- Fabric measuring tape
- glue gun
- Material for the coins. Can be buttons, felt, etc.
- Black felt square
- yarn scraps.(Can use the scraps from the rainbow)
- Black Permanent marker
- Fork

1. Measure around the outside of your wreath. You want to make sure you get even segments. Mine was 38 inches around and since I had chosen 6 rainbow colors, I had determine that I need each segment to be 4.75 inches each.
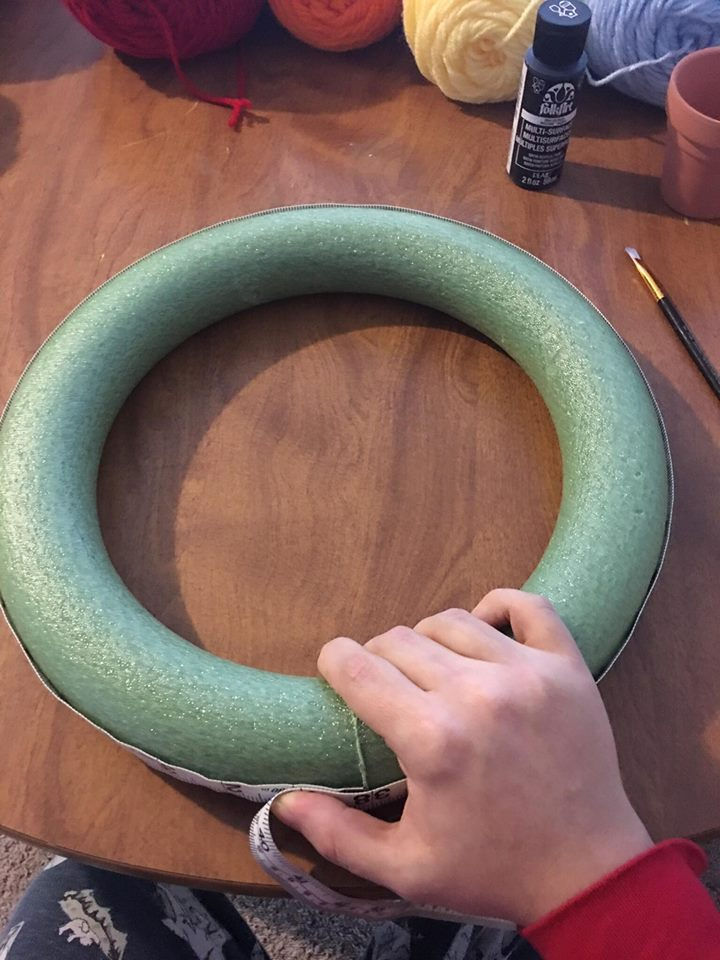
2. Pick up your Black permanent marker and start carefully marking a line around the wreath every 4.75 inches or whatever measurement you got if you got a different wreath or have a different number of colors.

3. You want to make sure that you leave a good amount of space for your grassy area. I left open two segments at the bottom
4. I take my first color of yarn and I pull out a good amount off the skein and cut it. This makes it easier to wrap around the wreath.
5. Take your hot glue gun and attach the beginning of your yarn to the inside of the wreath. This will hide the offset and keep the color transition clean.

6. You wrap your yarn around the wreath tight. This will give it a smooth look and keep the wreath from showing through.

7. Once that color is at the end of the next line, stop and check through it. Make sure none of the wreath is showing and make sure your yarn isn't overlapping. If so, just work your way through it. Then hot glue your end to the inside of the wreath and cut off the excess yarn.
8. Start on the next color. Repeat steps 5-7.
9. Once all colors are wrapped around your wreath, it's time to start on your grass.

10. For the grass, I created pom-poms of different sizes in the two colors of green. I will be giving you a quick walk through with some pictures on how to make one with a fork, but if you still find creating the pom-poms confusing, there are videos out there that can help a lot.
11. Take the beginning of your yarn and cut a piece off. Place that piece of yarn and place in in the middle of the fork prongs.
12. Start wrapping the green yarn around your fork.


13. When you get it to the size you desire, take the piece hanging from the center of the prongs and tie it around the wrapped yarn.

14. Pull off the fork carefully.
15. Make sure the center piece of yarn is tight around the wrapped yarn and double knot it as tight as you can.
16. Once that's done cut the outer edges of your yarn ball and fluff out. Put aside.
17. Repeat steps 11-16 to create your pom-pom yarn balls. You want to create enough to fill up the inside of your wreath when it's laying down.

18. Once all your grass is in place you may want to cut it down to make it more even. It's up to you with how you'd prefer to have your grass.

19. Attach the pom-poms to the wreath using your hot glue gun. Put them anyway you like to. It's up to you.

20. Next step is to paint your small ceramic pot. Make sure it's covered completely on the outside and a little bit on the bottom and inside.

21. Once it's dry, it's time to stuff your yarn scraps into your small ceramic pot. This will give it fluff to put the felt and coins on top of while not adding any weight. You can also use something like poly-fil or something similar as an alternative.


22. Next it's time to glue your felt square into your pot. You want to glue the corners inside of it.

23. For my coins, I decided to cut circles out of polymer clay and bake them. You can use various types of media to make your coins such as buttons, felt, paper, clay etc. Just whatever you had handy.
24. Once your coins are ready, it's time to glue them to the black felt inside your pot. You can place them wherever you wish. It's up to you.

25. Once you've glued your coins into place, it's time to glue your pot into the wreath. You want to get it in the middle of your grassy patch.

Once the pot is in place, you're done!
You can now sit back with an Irish beer and admire your work!
Completed a wreath? Show us your work! We love to see other projects :)


Comments